Friday 28 December 2018

How to schedule RFT (Rational Functional Tester) scripts to run using Jenkins / schedule

How to schedule RFT (Rational Functional Tester) scripts to run using Jenkins / schedule


1. Create a batch file with following content in it. 


"------1---------\java.exe" -Xmx1024m -classpath "----------2--------\rational_ft.jar" com.rational.test.ft.rational_ft -datastore "-------------3----------" -playback --4---

Where
1. Java installed path
2. RFT installed path
3. RFT project path
4. Main script name


2. Add the batch file created to Windows Task Scheduler

Open Task Scheduler from Start --> Programs

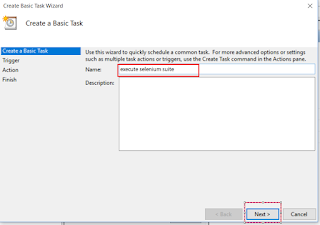
click on "Create Basic Task"


click Next and provide name to your task


Select Schedule interval and time and other parameters


Select "Start a Program" radio

Browse to the batch files path and select it


click on Finish. 


Now your program is scheduled to run :-). 

Wednesday 7 November 2018

Configuring puppet master and agent to sign certificates

Configuring puppet master and agent to sign certificates


While working with Puppet for the first time, often it could happen that due to various issues, we will not be able to complete basic configurations and hence spend lot of time debugging problem. This blog is an attempt to cut short those issues that are usually faced while configuring puppet master and agent and finally sign certificates.

Some of the usual issues faced are while running puppet agent --test command below exception occur.

Could not request certificate: The certificate retrieved from the master does not match the agent's private key

Could not request certificate: getaddrinfo: Name of service not known

Below steps can be followed for smooth configurations.


 1)     Make sure in both master and agent machine you resolve the hosts by going to
/etc/hosts file as given below:

10.2.3.4 puppet
10.2.3.5 node

Note here any host name and agent name can be given for your reference.

     2) Set variables in puppet.conf in master and agent machine.

In master machine (linux)
/etc/puppetlabs/puppet/puppet.conf

dns_alt_names = puppet
certname=puppetcert
environment=prod

Note here that dns_alt_name should be matching host name given in step(1).
certname can be any name to your certificate
environment is optional variable.

In Agent
/etc/puppetlabs/puppet/puppet.conf

server=puppet
certname=node1

Note here server should be matching puppet host name provided. In this example it is “puppet”
And again certname can be any name to your certificate.


3   3)   Restart both master and agent machine as you have resolved hosts.
     4)  Start puppet server in master machine with this command.


systemctl start puppetserver

check status of puppetserver

systemctl status puppetserver


puppetserver.service - puppetserver Service
   Loaded: loaded (/lib/systemd/system/puppetserver.service; enabled; vendor preset: enabled)
   Active: active (running) since Wed 2018-11-07 18:29:03 IST; 16s ago
  Process: 2710 ExecStart=/opt/puppetlabs/server/apps/puppetserver/bin/puppetserver start (code=exited, status=0/SUCCESS)
 Main PID: 2727 (java)
    Tasks: 26 (limit: 4915)
   Memory: 1.2G
      CPU: 1min 42.519s
   CGroup: /system.slice/puppetserver.service
           └─2727 /usr/bin/java -Xms3g -Xmx3g -XX:MaxPermSize=256m -Djava.security.egd=/dev/urandom -XX:OnOutOfMemoryError=kill -9 %p -cp /opt/puppetlabs/server/apps/p

Nov 07 18:27:16 master systemd[1]: Starting puppetserver Service...
Nov 07 18:27:16 master puppetserver[2710]: OpenJDK 64-Bit Server VM warning: ignoring option MaxPermSize=256m; support was removed in 8.0
Nov 07 18:29:03 master systemd[1]: Started puppetserver Service.


Above will confirm that service is up and running.

      5)  Start agent puppet with this command

puppet resource service puppet ensure=running enable=true

Notice: /Service[puppet]/ensure: ensure changed 'stopped' to 'running'
service { 'puppet':
  ensure => 'running',
  enable => 'true',
}

Above will confirm that agent is running.

      6) Now test agent by calling this command to generate certificate at node/agent

        puppet agent --test


Ignore any error that appears

      7) Now come to master machine and apply certificate using this command

sudo /opt/puppetlabs/bin/puppet cert list
"agentcert1"        (SHA256) 76:DD:B1:02:16:D7:BA:0F:AB:46:28:D9:7D:D4:75:DF:F7:52:D3:19:65:11:C9:B1:F7:5D:75:1B:DB:2E:3A:39
  "node"              (SHA256) 6C:D1:8C:40:A1:52:C6:F7:CE:44:FB:35:8C:EB:12:3D:2E:C8:F9:09:6B:CE:69:C7:D8:15:DA:A5:6E:17:8E:3B
  "slave.domain.name" (SHA256) A8:F8:AC:DB:8F:65:F0:B9:A5:37:23:F0:FC:1F:27:23:AB:C4:F2:5A:FB:4E:50:6B:55:3D:37:54:C1:0E:85:F8

Above we can see that all the certificates are listed which are yet to be signed. Since we have certificate with name "node" given for agent we can sign that. 


Sign certificate using this command:

sudo /opt/puppetlabs/bin/puppet cert sign node

"agentcert1"        (SHA256) 76:DD:B1:02:16:D7:BA:0F:AB:46:28:D9:7D:D4:75:DF:F7:52:D3:19:65:11:C9:B1:F7:5D:75:1B:DB:2E:3A:39
  "node"              (SHA256) 6C:D1:8C:40:A1:52:C6:F7:CE:44:FB:35:8C:EB:12:3D:2E:C8:F9:09:6B:CE:69:C7:D8:15:DA:A5:6E:17:8E:3B
  "slave.domain.name" (SHA256) A8:F8:AC:DB:8F:65:F0:B9:A5:37:23:F0:FC:1F:27:23:AB:C4:F2:5A:FB:4E:50:6B:55:3D:37:54:C1:0E:85:F8

       8)  Now certificate is signed. And again when you run agent test command at agent it will apply the catalog:
sudo /opt/puppetlabs/bin/puppet agent –test

Info: Caching certificate for node
Info: Using configured environment 'production'
Info: Retrieving pluginfacts
Info: Retrieving plugin
Info: Caching catalog for node
Info: Applying configuration version '1541597092'
Notice: /Stage[main]/Main/File[/tmp/it_works.txt]/ensure: defined content as '{md5}c8efc631283aebe758b494818c5842a1'
Notice: Applied catalog in 0.10 seconds


If you have any questions about this do write in comment below. 

Hope this blog has been useful to you. If yes do follow my blogs by entering your email by 
clicking on "Follow" (blue) button. 

You can as well explore my 

Youtube Channel: https://www.youtube.com/user/srinivaskinik

And 

facebook page: https://www.facebook.com/srinivaskinikalmady/

Thank you.


Friday 26 October 2018

How to use browser options to run in headless mode?

How to use browser options to run in headless mode?


First of all let us understand what is the meaning of headless mode. Headless mode is when you don't see browser GUI appearing but execution would go on in the back end. Where this would be useful?

1> When you want to only test the functionality of application and less care about GUI.
2> Also let's say there is huge data to be created using GUI and you don't want to see the browser GUI as it would be faster in headless mode.
3> You are running your tests in Jenkins CI machine where you don't want browser GUI to appear.


Chrome in headless mode: 

3.x version of Selenium allows using ChomeOptions class to pass headless options as given below:


ChromeOptions options = new ChromeOptions();
// option for headless mode
options.addArguments("--headless");

OR

options.setHeadless(true);

This options reference variable you will have to pass in ChromeDriver object like this:

WebDriver driver = new ChromeDriver(options);


Then, whatever code you have underneath, it will execute in backend and no longer open chrome browser GUI.

Firefox in headless mode: 


3.x version of Selenium allows using FirefoxOptions class to pass headless options as given below:


FirefoxOptions options = new FirefoxOptions ();
// option for headless mode
options.addArguments("--headless");

OR

options.setHeadless(true);

This options reference variable you will have to pass in FirefoxDriver object like this:

WebDriver driver = new FirefoxDriver (options);


Then, whatever code you have underneath, it will execute in backend and no longer open chrome browser GUI.

Internet Explorer in headless mode: 

Helium uses Selenium's InternetExplorerDriver to drive IE. Unfortunately Microsoft has not yet made IE11 fully compatible with this driver. So options like headless mode is not available in IE. It has to be run in GUI mode only. 


If you have any questions about this do write in comment below. 

Hope this blog has been useful to you. If yes do follow my blogs by entering your email by 
clicking on "Follow" (blue) button. 

You can as well explore my 

Youtube Channel: https://www.youtube.com/user/srinivaskinik

And 

facebook page: https://www.facebook.com/srinivaskinikalmady/

Thank you.

Thursday 25 October 2018

How to run Selenium scripts using batch file and schedule every day?

How to run Selenium scripts using batch file and schedule every day?


Generally we would like to have our automation suite to be scheduled so that it runs based on the scheduler settings. So I am assuming you will have TestNG suite (.xml) which you are planning to run. 

To achieve scheduling dividing tasks as below: 

1. Create batch file for the TestNG xml executed. 

We can create batch file with following content: 

set classpath=C:\Sel_WS\MySelenium\bin;C:\Srinivas Kini\Selenium_New\libs\*;C:\Srinivas Kini\Selenium Installers\eclipse-jee-mars-1-win32\eclipse\plugins\org.testng.eclipse_6.11.0.201703011520\lib\*;

java org.testng.TestNG TestNG.xml

pause


Here TestNG.xml is the TestNG suite we would like to execute. 


2. Add suite in OS scheduler. For windows, steps are given below: 

Open Task Scheduler from Start --> Programs

click on "Create Basic Task"


click Next and provide name to your task


Select Schedule interval and time and other parameters


Select "Start a Program" radio

Browse to the batch files path and select it


click on Finish. 


Now your program is scheduled to run :-). 

If you have any questions about this do write in comment below. 

Hope this blog has been useful to you. If yes do follow my blogs by entering your email by 
clicking on "Follow" (blue) button. 

You can as well explore my 

Youtube Channel: https://www.youtube.com/user/srinivaskinik

And 

facebook page: https://www.facebook.com/srinivaskinikalmady/

Thank you.


Friday 19 October 2018

How to attach screenshot image / link to Test NG report?

How to attach screenshot image / link to Test NG report?

First of all, let us know that Reporter.log() can be used to write additional text to Test NG HTML log file.

For eg: Reporter.log("msg");


To attach screenshot link to Test NG Report, simply we can define <a tag inside Reporter log
like this:

Reporter.log("<a href='" + new File(filePath+".png").getAbsolutePath() + "'>screenshot</a>");

Here, filePath is the exact path of file image to be attached.

This would be the sample output:


Note: It attached image hyperlink and when clicked on it, it would show the image. 


To attach directly image to Test NG report, we can define tag <img with src= file path as below: 

String path = "<img src=\"file://" + filePath2 + "\" alt=\"\"/>";
Reporter.log(path);

Here, filePath2 is the exact path of file image to be attached. 

This would be the sample output: 


Note: It attached image directly to Test NG report. 


if you have any questions about this do write in comment below. 

Hope this blog has been useful to you. If yes do follow my blogs by entering your email by 
clicking on "Follow" (blue) button. 

You can as well explore my 

Youtube Channel: https://www.youtube.com/user/srinivaskinik

And 

facebook page: https://www.facebook.com/srinivaskinikalmady/

Thank you.


Wednesday 17 October 2018

How to verify part of image in full image using Sikuli?

How to verify part of image in full image using Sikuli?


Let us assume in the application under test, we have a sub image / icon which needs to be verified for presence in main page. Here we want to verify image and not image attributes like src and so on. For verifying src attributes we can use getAttribute() method of Selenium and check whether it is containing expected value. 

To verify exact image presence we can use Sikuli tool. 

Sikuli is image recognition tool. Let us assume we have 2 file images. 

1. sub image / icon. 
2. main image

To use Sikuli, we need Sikuli libs imported in eclipse project. For eg: sikulixapi.1.1.3.jar (http://www.sikuli.org/)

(i) First we can define the Pattern ref object using Pattern class in Sikuli. 
String file_loc ="C:\\Images";
Pattern subImage= new Pattern(file_loc+"\\subImage2.PNG");

(ii) Using Finder class of Sikuli we can create object related to main image:

Finder finder = new Finder(ImageIO.read(new File(file_loc+"\\mainImage.png")));

(iii) And using find() method of Finder class we will know whether subimage is present in main image or not.

finder.find(subImage);

if(finder.hasNext())
{
System.out.println("Found the subImage");
}
else
{
System.out.println("Didnt Found the subImage");
}

Note: This similar logic can be used to compare 2 images whether they are equal or not.

Also, if your project requirement is to check whether 2 images are exactly equal.

Then you can use exact() at the pattern like this:

subImage.exact(); // which will verify for exact image presence in main image / other image. 

Similarly if your requirement is to check 70% image match or x percentage, then you can use similar(0.7f) or any floating value. For eg:

subImage.similar(0.7f); // will check for 70% match in main image / other image. 

if you have any questions about this do write in comment below. 

Hope this blog has been useful to you. If yes do follow my blogs by entering your email by 
clicking on "Follow" (blue) button. 

You can as well explore my 

Youtube Channel: https://www.youtube.com/user/srinivaskinik

And 

facebook page: https://www.facebook.com/srinivaskinikalmady/

Thank you.


Saturday 13 October 2018

How to get exact element screenshot captured in Selenium?

How to get exact element screenshot captured in Selenium?


In Selenium, we can capture full screenshot using TakesScreenshot Interface. 

File screenshot = ((TakesScreenshot)driver).getScreenshotAs(OutputType.FILE);

screenshot will contain the full screenshot. We could copy that file to any location we want using FileUtils (Apache commons - https://commons.apache.org/). 

File destFile = new File("C:\\Images\\dest.png");
FileUtils.copyFile(screenshot, destFile);


Now to be able to capture exact element screenshot, we need to get dimension of element first. 

let us consider this is the element we have. 

WebElement ele = driver.findElement(By.id("hplogo"));

getLocation() will give us x and y coordinates of element. 
getWidth() and getHeight() will give us width and height of element rectangle respectively. 

// Get the location of element on the page
Point point = ele.getLocation();

// Get width and height of the element
int eleWidth = ele.getSize().getWidth();
int eleHeight = ele.getSize().getHeight();


To capture element screenshot, we need to get portion of image from full screenshot.

// Get entire page screenshot
File screenshot = ((TakesScreenshot)driver).getScreenshotAs(OutputType.FILE);
BufferedImage  fullImg = ImageIO.read(screenshot);

Now, fullImg contains, full screenshot.

We can use getSubimage() method to get portion of it as given below:


// Crop the entire page screenshot to get only element screenshot
BufferedImage eleScreenshot= fullImg.getSubimage(point.getX(), point.getY(),
    eleWidth, eleHeight);
ImageIO.write(eleScreenshot, "png", screenshot);

// Copy the element screenshot to disk
File screenshotLocation = new File("C:\\Images\\Test.png");
FileUtils.copyFile(screenshot, screenshotLocation);


This way, we can capture exact element screenshot.

Very Imp Note: If you are working on OS like windows 10, where zoom level is 125% or something, you may not get exact screenshot of element due to zoom level set. So set zoom level to 100% which will give proper screenshot. 


if you have any questions about this do write in comment below. 

Hope this blog has been useful to you. If yes do follow my blogs by entering your email by 
clicking on "Follow" (blue) button. 

You can as well explore my 

Youtube Channel: https://www.youtube.com/user/srinivaskinik

And 

facebook page: https://www.facebook.com/srinivaskinikalmady/

Thank you.

How to schedule RFT (Rational Functional Tester) scripts to run using Jenkins / schedule

How to schedule RFT (Rational Functional Tester) scripts to run using Jenkins / schedule 1. Create a batch file with following content ...